No products in the cart.
How to Log into a Hikvision IP camera that is connected to a Hikvision NVR?
Step 1
Open up SADP program (download here – https://www.securitywholesalers.com.au/faqs/hikvision-sadp-tool-can-download/ SADP will give you the IP address of the recorder . You should see the IP address next to the NVR model number.
Step 2
Open up an Internet browser and type in the IP address of the NVR.
Note some browsers will have plugin issues with Live-view, so you may need to use the below plugin for Chrome. IE Tab – Chrome Web Store (google.com)
Step 3
Log in using username and password of the recorder.
Step 4
Go to Configuration > Network > Advanced Settings > Other.
Tick “Enable Virtual Host”
Step 5
Go to Configuration > System > Camera Management > Click on the blue link next to the camera you wish to log into.
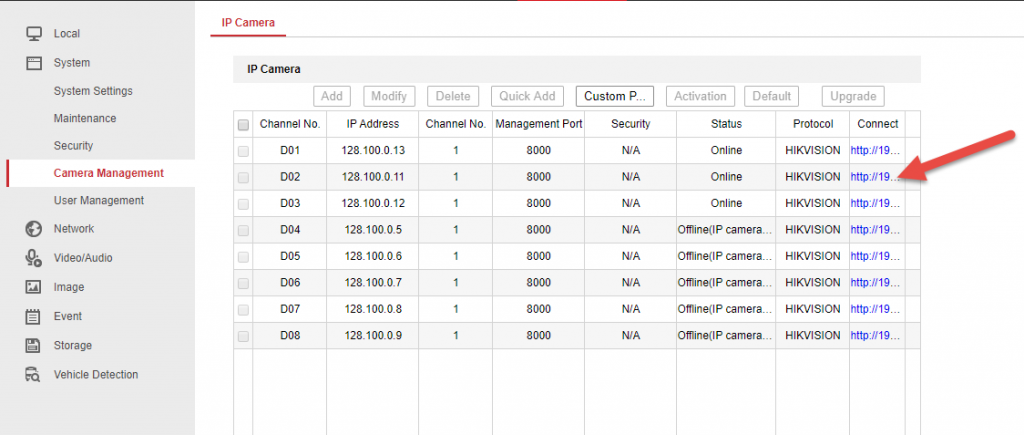
Step 6
Log into the camera. (same username / password as the NVR if the NVR activated the camera)
There you have it – you’re now logged into the camera and ready to perform actions on the camera.
——————————————–
If the above steps don’t work, please follow the steps below:
STEP 1
CONNECT A CABLE FROM your PC (ie. ethernet cable from your PC to your CAMERA PORT (so if you have a 4ch and 4 cameras, you’ll need to unplug 1 cam and plug in there))
STEP 2
Load up SADP – you should see all the IP addresses of the cams listed.
STEP 3.
Change the PC subnet / gateway / to match that of the cams. IP should be in the same ‘network’
Network adapter / Right click on active connection / Properties / TCP/IP4 / Properties – change details here.
STEP 4
Enter the IP address of the CAMERA into the browser. If your settings for step3 were correct, you should be able to log in.


