, ,

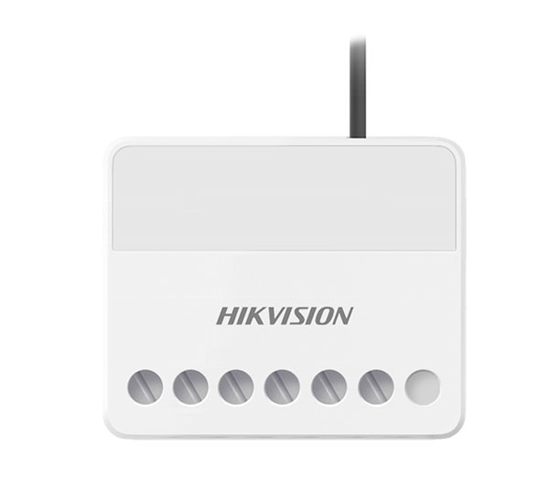
Hikvision AX PRO Series DS-PM1-O1L-WB Relay Module


The AX Pro relay module allows you to control other items like garage door through your alarm system including the Hik-Connect App. The design is small so easy to hide.

  • 433MHz two-way wireless communication
  • AES-128 encryption
  • LED display, show status of device and replay on/off display
  • Small case design, which can be put into hiding places easily
  • Automation operating, one button turn on/off from APP/Keyfob/Keypad
  • Setting scenarios by different events
  • With one tamper input, can be used as zone input for alarm

SW_DS-PM1-O1L-WB Spec Sheet

User manual

$66.00 inc GST +3 Year Warranty & Support

Software Features

  • Learning Button 1, For register
  • Scenario Setting By Alarm, By Operation, By Fault, By Schedule, By Manual

Hardware Features

  • Alarm Input 1 for tamper, NO/NC
  • Relay Output 1, NO/NC (0~36V DC, Max 5A)
  • Serial Port 1, for debug

RF Transmission

  • RF Method Two way communication
  • RF Modulation 2GFSK
  • RF Frequency 433MHz
  • RF Distance 800m
  • Wireless Security AES-128

Electrical Characteristics

  • Power SupplyDC 7V – 24V

Display

  • LEDs Status3, Register/Signal (Green/Red), Power (Green), Relay Status (Blue)

General

  • Operation Temperature ﹣10℃~+55℃
  • Operation Humidity 10%~90%
  • Shell Material Plastic
  • Dimension(WxHxD) 38x25x18mm
  • 28.5g
  • Color White
  • Installation Method Wall Mounting

HOW TO CONNECT WITH GARAGE DOOR?

To control your garage door using the Hikvision AX PRO Series DS-PM1-O1L-WB Relay Module, follow these steps:

  1. Power the Relay Module: Connect the relay module to a DC power supply ranging from 7V to 24V. Ensure the power source matches the module’s specifications.
  2. Integrate with the AX PRO Control Panel:
    • Registration: In the Hik-Connect app, navigate to your AX PRO control panel and select the option to add a new device. Scan the QR code on the relay module. After scanning, power on the relay module within 30 seconds to complete the registration.
    • Automation Setup: Within the app, configure automation settings to control the relay module. This setup allows you to operate the garage door via the app or associated keyfobs.
  3. Connect to the Garage Door Opener:
    • Identify Control Terminals: Locate the manual push-button terminals on your garage door opener. These terminals are typically used for wall-mounted open/close buttons.
    • Wiring: Connect the relay output terminals of the DS-PM1-O1L-WB to these push-button terminals. When the relay activates, it simulates a button press, triggering the door to open or close.
  4. Testing: After completing the connections, test the setup by using the Hik-Connect app to operate the garage door. Ensure the door responds correctly to the relay activation.

Safety Precautions:

  • Professional Assistance: If you’re unfamiliar with electrical systems or the specifics of your garage door opener, consult a professional installer to ensure safety and proper functionality.
  • Compatibility Check: Verify that your garage door opener is compatible with external relay controls before proceeding.

By following these steps, you can effectively integrate the Hikvision DS-PM1-O1L-WB Relay Module with your garage door system, enabling remote control through the Hik-Connect app.

Register a Free Account now for access to Better Prices or Log-In Here

Save & Share Cart
Your Shopping Cart will be saved and you'll be given a link. You, or anyone with the link, can use it to retrieve your Cart at any time.
Back Save & Share Cart
Your Shopping Cart will be saved with Product pictures and information, and Cart Totals. Then send it to yourself, or a friend, with a link to retrieve it at any time.
Your cart email sent successfully :)